HD Lighting and Rendering
Version 22 features a new lighting renderer that allows you to adjust your lighting more easily to produce much higher quality, more realistic HD images. Lighting is very subjective and therefore we recommend that you practice until you find lighting schemes that suit your personal lighting preferences. Here are some useful tips for editing your lighting:
Version 22 HD automatically floods light coming into the room through windows, archways, and open doors. We can also manually put directional light into the plan by clicking Sun/Sky Lighting.

Select 'Down Light' in the list and click Add. In the editor, select 'Materials'. Once in the materials editor, select 'Down Light Lens' from the list. Choose the 'ArtiCAD Default Library'. From the menus, select 'Misc' and choose 'Lit LED'
Step 3 - HD Render


Step 1 - Removing standard lights & adding sunlight.
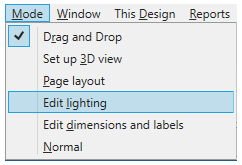
Select 'Mode' - 'Edit lighting'
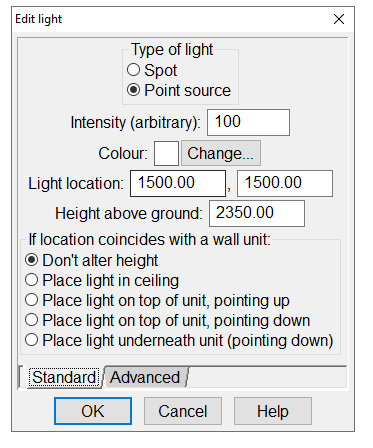
Select the point source and press 'F1' - Change the intensity from 100 to 0 (as below), essentially switching it off.
Select the point source and press 'F1' - Change the intensity from 100 to 0 (as below), essentially switching it off.
Unlike photo realism, HD doesn't need a point source within the room.
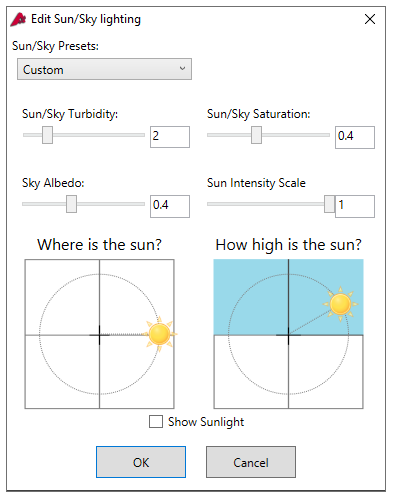
Version 22 HD automatically floods light coming into the room through windows, archways, and open doors. We can also manually put directional light into the plan by clicking Sun/Sky Lighting.
You don't normally need to edit these factors as this is what they do.
Sun/Sky Turbidity: The warmth (colour) of light coming into the room. The left side of the scale is more white, like the midday sun. To the right of the scale the light becomes warmer in colour, like a feint orange morning or evening sun.
Sun/Sky Saturation: This is the overall colour of light that comes into the room which is then bounced or saturated around the room. To the left of the scale decreases the saturation whereas to the right of the scale will make the colour more prominent in the room.
Sun/Sky Albedo: Determines how much the light reflects off of different types of surface. So, depending on what your material reflectance setting are set to, the reflectance will adjust accordingly. To the left side of the scale makes the light not reflect at all, whereas the right makes it more reflective.
Sun/Sky Scale: This represents the intensity of the light coming through.
Where is the sun?: Shows the direction of light coming into the room. You can change direction by holding down left click and moving the mouse.
How high is the sun?: Shows the angle it comes into the room. Same movement controls as above.
Step 2 – Down lights & Giving Objects a Lit Appearance
You can alter any object or material to make it effectively emit light.
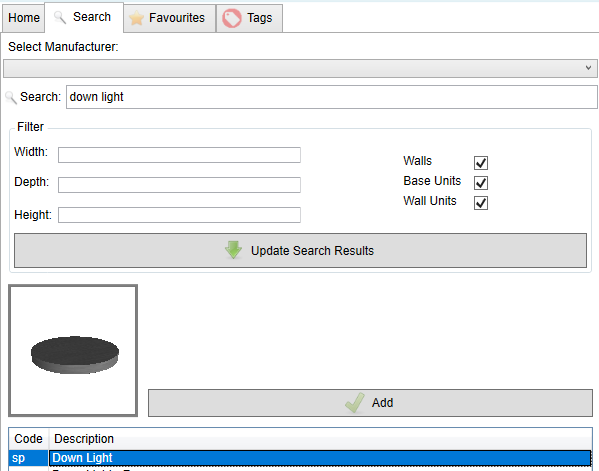
In Plan View, in the Search dialog on the left side of the screen, key in 'down light', as below.
Select 'Down Light' in the list and click Add. In the editor, select 'Materials'. Once in the materials editor, select 'Down Light Lens' from the list. Choose the 'ArtiCAD Default Library'. From the menus, select 'Misc' and choose 'Lit LED'
You can change the brightness of the light by selecting 'Customise...' and altering the 'Diffuse'
Once positioned in the design, press 'F9' to duplicate if you require more than one down light with the same properties.
In V22 the HD Render auto levels any lights you put into the design - meaning that you do not need to adjust the intensities of lights, just place the lights where you want them to appear.
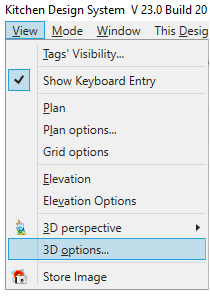
Click on 'View' - '3D Options'.
In HD you have two Quality Settings – Quality and Antialiasing Quality:
Quality: Allows you to select the lighting and shadowing quality using 5 settings: low; medium; high; higher; and highest.
*High is a good quality setting to use.
Antialiasing Quality: Allows you to set how sharp the image is, from 5 settings, 1x, 2x, 4x, 6x, 8x
*4x is a good quality setting. Any higher will give an improved Image but will take longer to render.
Now set up a 3D View and render in HD.
When HD is still rendering and also once it has rendered, HD gives you multiple scale options.
Related Articles
HD Lighting and Rendering (BathCAD)
Version 22 features a new lighting renderer that allows you to adjust your lighting more easily to produce much higher quality, more realistic HD images. Lighting is very subjective and therefore we recommend that you practice until you find lighting ...HD Lighting and Rendering (BedCAD)
Version 22 features a new lighting renderer that allows you to adjust your lighting more easily to produce much higher quality, more realistic HD images. Lighting is very subjective and therefore we recommend that you practice until you find lighting ...Lighting Your Design (BedCAD)
This chapter will explain how to alter the lighting in your design. Altering the lighting in your design can dramatically improve the finish of your photo-realistic images - the amount of light required will vary from design to design. It is up to ...Lighting Your Design (BathCAD)
This chapter will explain how to alter the lighting in your design. Altering the lighting in your design can dramatically improve the finish of your photo-realistic images - the amount of light required will vary from design to design. It is up to ...Lighting Your Design
This chapter will explain how to alter the lighting in your design. Altering the lighting in your design can dramatically improve the finish of your photo-realistic images - the amount of light required will vary from design to design. It is up to ...